Robot Class in Selenium WebDriver
Introduction
There are a specific set of activities that are performed accurately by Robots such as managing mouse and keyboard functions, executing tasks within a specified timeframe, etc. In this blog, we shall understand how robots are helpful in handling keyboard and mouse functions when you are in a process of application testing using Selenium.
Robot Class
Any given task will require time to be done. So, completing the task on time is the key aspect of any application testing. Robot Class was introduced to create native system inputs for automating the testing process, self-running demonstration sessions, etc. It is done on other applications that require control on keyboard and mouse. OS pop-ups are not managed appropriately in WebDriver. Hence, Java 1.3 version has Robot Class in it. The chief reason for introducing Robots is to enable automated testing in Java.
Significance of Robot Class
This concept has its own signification. It makes many activities easy in the testing process. Let us see some of them:
- Through Robot class file uploading or downloading is easy.
- It stimulates and controls keyboards and mouse functions.
- It also handles pop-ups.
- It can be integrated with any automation framework like hybrid, data-drive, etc.
Various Methods for Implementing Robot Class
Test scripts can be easily executed if you use the following methods for implementing Robot Class:
- MousePress()
- MouseRelease()
- MouseMove()
- KeyPress()
- KeyRelease()
MousePress():
This is a method that is used to press the left button in the mouse. See the example illustrated below for better understanding. It helps in pressing the mouse.
MouseRelease():
As the name itself suggests, this method is used to release the mouse button which has been pressed. It is used to release the right button in the mouse.
MouseMove():
You can use this method to move the mouse pointer from one coordinate to the other. It helps in moving the mouse from co-ordinate A to co-ordinate B.
KeyPress():
You can use this method to press any key. The UP key in the keyboard will be pressed.
KeyRelease():
This can be called out to release the pressed key on the keyboard. It will release the caps lock key in the keyboard which is pressed.
Documentation of Robot Class
Before you start using Robot Class, you must clearly understand the syntax, basic functions, and using all methods in Robot Class. There is a well-explained document in the official site of Oracle which you can refer. However, you can always create your own documentation. Below are the steps you need to follow for creating the Robot Class documentation.
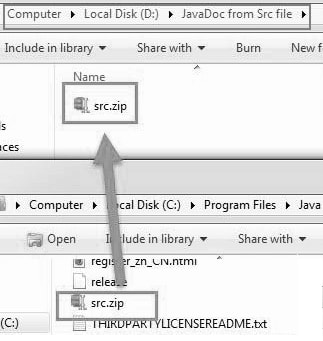
Step1: Look for src.zip file in the JDK folder and extract it to another folder.

Step2: Now extract src and then navigate to:
Step3: Next, copy your present awt folder location and then open prompt command.
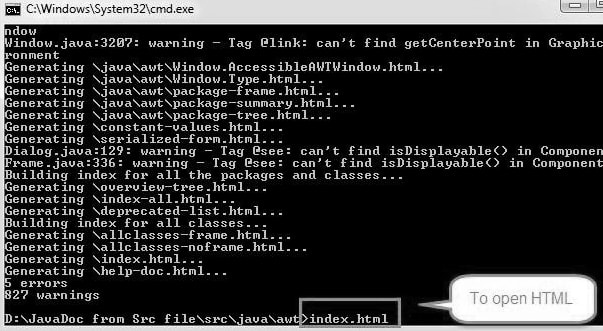
Step4: Now, change the current directory location in cmd to awt folder and then type the below-given code:

Once the system processes this code, you will see some HTML files in the awt folder.
Step5: Now, open an index.html

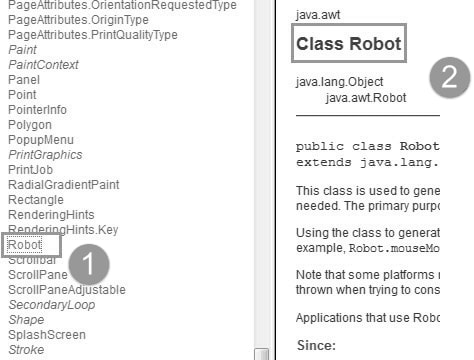
Step6: Now, you will see full documentation on awt package. Click the ‘Robot’ hyperlink using the left navigation bar. Mark 1 in the below image shows the robot class hyperlink. Marked 2 shows all interfaces and methods available in Robot Class

Implementing Robot Class in Selenium
Let’s consider that you are trying to automate your website page for enhancing its interaction.
Step1: Link your browser driver to ChromeDriver. You must specify the path.
Step2: Check the corresponding URL of the webpage and you will see that OS pop-up will appear on your screen once you navigate.
Step3: Use element locators to find the element available on your web page.
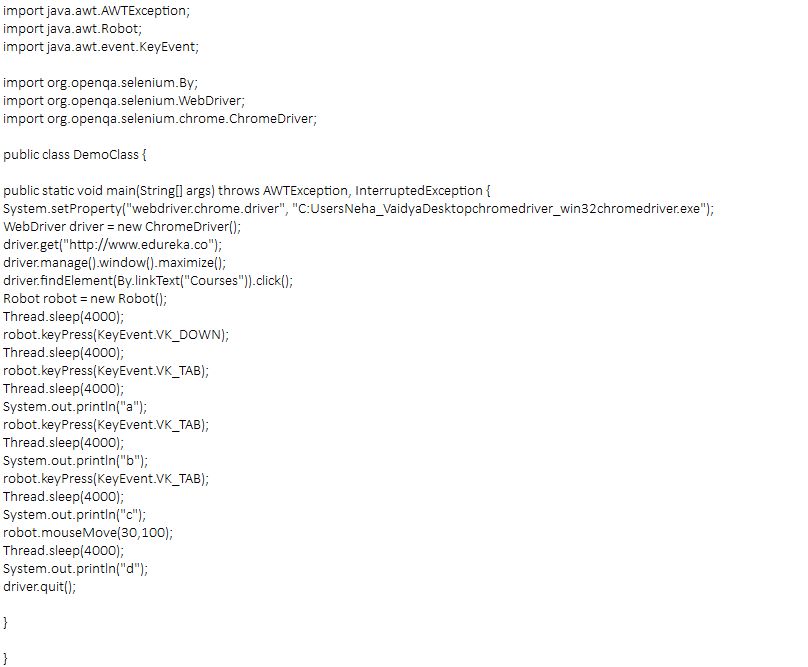
Step4: Now, use Robot Class to handle pop-up which is available in awt package of JDK. Use code
- Use this code to press down arrow
- Use below key to press the TAB key in the keyboard
- Use this code to press the Enter key
Following are the steps that you to carry out in order to perform mouse actions:
Step1: Use MouseMove() method which considers x and y coordinates as parameters like robot.mouseMove(640, 360), here 640 means x-axis and 360 means y-axis. Using this method you can move the mouse from your current position to x or y points.
Step2: Use the method MousePress() here
Step3: Once you press the mouse, you must release it. Use MouseRelease for this action which releases the left button in the mouse.

In the output, first, you will get the URL of the webpage that you wish to automate, then it navigates to the next page with the help of LinkText, then it presses Tab key, and finally, it executes all the mouse actions.
Disadvantages of Robot Class
Every functionality has advantages and disadvantages of its own. The same is the case for Robot Class as well. Listed below are some disadvantages or limitations in Robot Class:
- Mouse or keyword events can only be used in the current window. Let’s say you are performing code in a robot class event, and you move to another screen, then the mouse or keyword event will appear on that particular screen. It gets shifted.
- Some methods are resolution dependant like mouseMove, this may not work in types of resolutions and all types of machines.

